Hey there! If you're a homeowner, you know how important it is to keep your roof in top - notch condition. One of the common issues you might face is missing roof tiles. As a roof tile supplier, I've seen this problem a lot, and I'm here to share some tips on how to repair those missing roof tiles.
Step 1: Safety First
Before you even think about climbing up on the roof, safety should be your number one priority. You need to make sure you have the right safety equipment. A good quality safety harness is a must - have. It can prevent you from falling off the roof, which is a serious risk. Also, wear non - slip shoes. The roof can be slippery, especially if it's wet or dirty.
Set up a sturdy ladder against the house. Make sure it's placed on a flat and stable surface. Check the ladder for any signs of damage before you start climbing. It's also a good idea to have someone on the ground to hold the ladder for extra stability.
Step 2: Assess the Damage
Once you're safely on the roof, take a good look at the area where the tiles are missing. Try to figure out why the tiles are gone. It could be due to a storm, strong winds, or just old age. Look around for any other damaged tiles that might need to be replaced soon.
Count the number of missing tiles. This will help you when you go to buy the replacement tiles. Make sure to note down the size, color, and style of the existing tiles so that you can find a perfect match. As a roof tile supplier, I can tell you that getting the right match is crucial for the overall look and functionality of your roof.
Step 3: Gather Your Tools and Materials
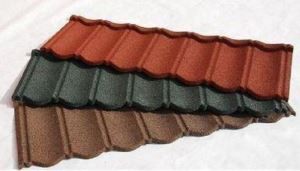
To repair the missing roof tiles, you'll need a few tools and materials. You'll need a hammer, a pry bar, a trowel, and some roofing nails. For the materials, of course, you'll need the replacement roof tiles. You can find a wide range of roof tiles on our website, like Coated Metal Roofing Sheets, Colour Coated Roofing Sheet, and Antique Prepainted Steel Glazed Roof Tile for Villas Roofing. These tiles are not only durable but also come in various styles to suit your home's aesthetic.
You'll also need some roofing cement. This will help to seal the edges of the tiles and prevent water from leaking through.
Step 4: Remove the Damaged Tiles (if any are left)
If there are any broken or damaged tiles around the missing ones, you'll need to remove them first. Use the pry bar to gently lift the tiles. Start from the bottom of the tile and work your way up. Be careful not to damage the surrounding tiles.
Once the tile is loose, pull it out and set it aside. You might be able to reuse some of the nails, but if they're bent or damaged, it's best to use new ones.
Step 5: Prepare the Area
Before you install the new tiles, you need to prepare the area where they'll be placed. Use the trowel to clean off any debris or old roofing cement. Make sure the surface is clean and dry. This will help the new tiles adhere better.
Step 6: Install the New Tiles
Now it's time to install the replacement tiles. Start by placing the first tile in the empty space. Make sure it fits snugly and aligns with the surrounding tiles. Use the hammer and roofing nails to secure the tile. Drive the nails through the pre - drilled holes in the tile and into the roof deck.
Space the nails evenly along the edges of the tile. Don't over - tighten the nails, as this could crack the tile. After you've installed the first tile, repeat the process for the remaining tiles.
Step 7: Seal the Edges
Once all the new tiles are in place, use the roofing cement to seal the edges. Apply a thin layer of cement along the edges of each tile. This will help to prevent water from seeping under the tiles and causing leaks.
Use the trowel to smooth out the cement and make sure it covers the entire edge. Let the cement dry completely before you step on the tiles again.
Step 8: Final Inspection
After the cement has dried, do a final inspection of the repaired area. Check to make sure all the tiles are secure and there are no gaps or loose edges. Walk around the roof carefully and look for any signs of water pooling or other potential problems.
If everything looks good, you've successfully repaired your missing roof tiles!
Why Choose Our Roof Tiles?
As a roof tile supplier, we take pride in offering high - quality roof tiles. Our Coated Metal Roofing Sheets are known for their durability and resistance to harsh weather conditions. They can withstand strong winds, heavy rain, and even hail.
The Colour Coated Roofing Sheet comes in a variety of colors, so you can choose the one that best matches your home's exterior. And our Antique Prepainted Steel Glazed Roof Tile for Villas Roofing adds a touch of elegance to any villa.


If you're in the market for roof tiles or need more advice on roof tile repair, don't hesitate to reach out. We're here to help you make the right choice for your home. Whether you're a DIY enthusiast or planning to hire a professional, our team can provide you with all the information you need.
Contact us today to start a conversation about your roofing needs. We look forward to working with you!
References
- "Roofing Repair Manual" - A comprehensive guide on various roofing repair techniques.
- "Home Improvement Magazine" - Articles on maintaining and repairing different parts of a home, including the roof.